Monday, November 26, 2012

How to transfer files to Amazon EC2 instance using FileZilla

SFTP access to Amazon EC2 using FileZilla

When using cloud service like Amazon EC2, most trivial task will be to get your data/files up the cloud. Amazon offers secure ftp (SFTP) service and gives instructions how to use it on command line.

But if you have many files stored in separate locations, it will be easier to use a GUI application like FileZilla. And best thing about FileZilla is that it works on Mac, Linux and Windows. Ubuntu has also included FileZilla in their repository and you can install it on Ubuntu using:

sudo apt-get install FileZilla

Before using FileZilla to upload files, make sure you follow the steps given in EC2 documentation, activate SSH and test it on the shell/command prompt.

Amazon uses authentication using key file and does not accept username & password combination, unlike other SFTP services. When you add a new site to FileZilla site manager, you wont find option to use key-file.

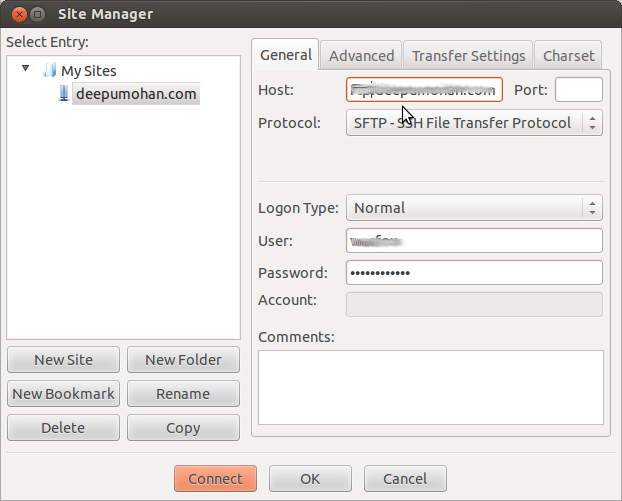
You need to import the key file in another location. Go to Edit --> Settings, you will find the option to upload keyfile under the SFTP option.

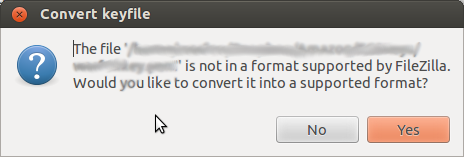
FileZilla will convert *.pem file to .ppk file which is Putty Private Key format and save it in a location you specify.

Now you can use upload files to your EC2 instance without a glitch. FileZilla will automatically authenticate using the added key file. You may add other key files along with Amazon EC2 keyfile, it will still authenticate you.

Wednesday, November 21, 2012

Disable dashboard on startup in Spring Tool Suite

You can increase the startup speed of Spring Tool Suite by disabling the Dashboard which gives you a lot not so important new and updates at the startup. And yeah, if you disable it you don't have to close it every time you open STS.

Option to disable the dashboard is available in the preferences.

  1. Close the dashboard if it is already open
  2. Goto Window >> Preferences
  3. Locate SpringSource >> Dashboard
  4. Uncheck the option that says Show dashboard on startup.
Spring tool Suite disable dashboard

Next time you open Spring Tool Suite, no more annoying dashboard.

By any chance if you want to enable it again, just enable the checkbox again.

Friday, November 16, 2012

jQuery:: Getting started with jQuery

This is a beginners guide and information to getting started with jQuery. As you might know jQuery is light weight and cross browser, and is a leading JavaScript library. It was created by John Resig, while he was working in Mozilla.

jQuery is a fast and concise JavaScript Library that simplifies HTML document traversing, event handling, animating, and Ajax interactions for rapid web development. jQuery is designed to change the way that you write JavaScript.

What is JavaScript library?

JavaScript libraries help you write more organised JavaScript code. These libraries are built on top of JavaScript and helps the programmer to write more maintainable cross-browser JavaScript.

Write less, do more

As it says on the home page, jQuery helps you to reduce your JavaScript code with clever, short and easy to understand syntax.

Why do we need jQuery? (or any other js framework)

In short, for faster development and better maintenance. If you have developed web application, you know the pain for writing vanilla JavaScript and hacking it to work as expected on all available browsers. The code base becomes huge and cluttered, which in turn effects the application maintenance. You could minimize it, by the clever use of JavaScript objects and prototyping. But a new developer may not be able to follow your code, unless it is properly documented and you are trying to re-invent the wheel.

If you are using a js framework like jQuery, then you can be sure that it is properly documented and there is a huge community out there to help you out.

Other JavaScript libraries?

There are lots of other js frameworks like Mootools, Dojo, Prototype, YUI and many more. Deciding which one to select depends on various factors like the project requirement, resource available, deadline etc.

What I liked about jQuery is that is easy to get started and get cracking. They say Mootools is great, I found their documentation poor. Mootools is a great choice if you are going to develop a complex application with lots of custom objects in it. jQuery is more focused on manipulating collections returned by the selectors.

For example jsFiddle is built on Mootools, building that on jQuery would have been harder.

How can jQuery help?

  • Its fast - Test JavaScript framework selectors speed at slickspeed
  • Cross browser - Forget about writing js hacks for IE, same code works everywhere.
  • Small size - just 55kb
  • Easy animations and CSS3 selectors.
  • Makes your REST client simple, with built in ajax support.
  • Extremely simple to get started

Onload event

Most javascript developers use the onload event either in the body tag or window.onload in javascript. But when using jQuery you don't do it like that.

Instead, you load the jQuery. file and use $(document).ready(); function available. Most jQuery functions allows callbacks. Callback functions are called up on an event.

$(document).ready(function () {
  alert('loaded');
});

This will alert 'loaded', when the document is loaded. Here the callback function is defined as an anonymous JavaScript function, which jQuery calls on the event of 'document ready'. Read about the difference between onload & document ready here.

Selectors

To get started with jQuery you should need an understanding of selectors. Selectors always return us a collection of jQuery objects, which we can manipulate. We may select an object using its id, class name, tag name or its combinations. The rules are similar to CSS rules. Id is referred using '#', class is referred using '.' and tags are selected using the tag name.

For example an element with id myelement is selected by

    $('#myelement')

All elements with class myclass is selected by

    $('.myclass')

And all p elements can be selected by

    $('p')

As you have figured out all p elements with class myclass is selected by

    $('p .myclass')

After selecting an element or group of element, you can manipulate is using various functions available in jQuery or in plugins. You may as well write your own jQuery plugins.

Now let us look at doing something with jQuery and JavaScript. We will try a simple example of changing the text content in an html element. Here is the content we want to change:

We will change the 'Old Text' to 'New Text'

Change html text using JavaScript

Fiddle here: http://jsfiddle.net/gh/gist/library/pure/3775927/

Now the same stuff in jQuery.

Change html text using jQuery

Fiddle here: http://jsfiddle.net/gh/gist/jquery/1.8/3776540/

In jQuery we did that in one line and the code is so much easy to understand. Also it processes fast as it doesn't wait for the complete all content to load, as soon as the DOM is available, jQuery starts it job.

Tuesday, November 6, 2012

How to unlock Samsung Galaxy Ace (for free) from a network

My phone was locked to 3 network here in UK and I badly needed to unlock it because my other phone got damaged and couldn't afford to get a new phone. You can get an unlock code from your service provider by making a payment of £15 (when writing this blog), in UK. I would rather spent my money on beer than on phone unlock codes. Any how, I got a solution for this and here I am sharing it with you.

This method is recommended for Samsung Galaxy Ace (GT-S5830) only and when I did this my phone was running on Gingerbread version 2.3.6. However, the developer claims it may work in the following models too.

  • Samsung 5 Europe (i5500)
  • Samsung 551 Callisto (i5510)
  • Samsung (i5700)
  • Samsung 3 (i5800)
  • Samsung Pro (i5510)
  • Samsung Galaxy mini (S5570)
  • Samsung Fit (S5670)
  • Samsung Ace (S5830)
  • Samsung Pro (B7510)

I would also add, that the paid method is definitely risk free and safer than this method.

Before proceeding check your phone lock status by dialing *#7465625#. The Network Lock should be [ON] now.

First you need to root your galaxy ace. Procedure for rooting the android device can be found in my previous post.

Edit

Secondly, you MUST install BusyBox and run it once. Running BusyBox will ask for super user permission, grant it. Otherwise unlock codes won't be visible. This step is important, else chances are you will get 'or or or' problem, as mentioned by many commenters. Thanks much to Asok, Ratty and Daniel Hamblett (commenters) for notifying this.

Once you have BusyBox ready with root access, download and install Galaxy Ace Unlock by Helroz

https://play.google.com/store/apps/details?id=com.helroz.galaxyaceunlock

This app can be run only on a rooted device. There are only 3 steps to get your phone unlock code

Getting the unlock key

  1. Run the app
  2. Touch on the option given. Unlock. See your sim unlock code
  3. Confirm your choice by selecting Yes on the next screen.
  4. Wait till the app shows the unlock codes.

The app extracts the network unlock code from the phone and shows it for you. It may give upto 4 different unlock codes. In my case all the four unlock codes were same. Note down the unlock codes.

Once you have the unlock codes, switch off your phone and boot it with an unsupported sim card.

When the phone boots it will ask for the unlock code.

Key in the unlock code. Do not try the same unlock code more than once. Any one of the unlock code will have worked.

If the unlock is successful it will display this message. Network unlock successful

Now if you dial *#7465625#, the Network Lock will be [OFF].

That confirms you have successfully unlocked your phone from the network.

Here is a video for those who are too lazy to read... :P

Monday, November 5, 2012

How to root your Samsung Galaxy Ace

Rooting an Android device allows the access to root user in the operating system. I needed to get root access in order to unlock my phone from the network. It is pretty simple procedure and I followed the instructions given at androidforums. While rooting, my device was running Gingerbread 2.3.6

Step by step instructions for rooting the device is clearly given in the Android forum post by victors1995. My device had no issues after rooting. You will see a new launcher called super user in your software list, which can be used to grant or revoke super user capabilities to other apps. I went ahead and installed Busybox free and Root checker basic.

After rooting I also unlocked my phone from the network.

NB: Do this at your own risk. Rooting may void the warranty of your device.

If it helped share it with your friends. Feel free to comment about your experience.

Here is an instructional video on how to do this

Related Posts Plugin for WordPress, Blogger...